Released : Wet And Tanned Skins For Genesis 8.1 Bundle (Commercial)
 V3Digitimes
Posts: 3,198
V3Digitimes
Posts: 3,198
Find it here : https://www.daz3d.com/wet-and-tanned-skins-for-genesis-81-bundle
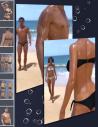
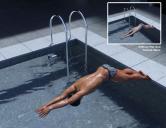
Wet And Tanned Skins For Genesis 8.1 Bundle is finally coming! Based on the same, but improved, principle of the version for Genesis 8, here is as a summary of what you will find:
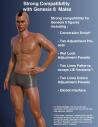
- The ability to browse wide ranges of skin tones, from super pale to super tanned,
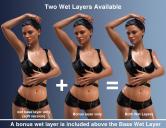
- The ability to adjust the wet looks from dry to super wet,
- Based on a custom made shader relying on the PBRSkin shader,
- Everything is optimized for Genesis 8.1 figures, and remains strongly compatible with all Genesis 8 figures (developed to support both UV sets and original shaders).
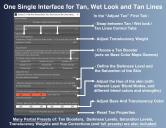
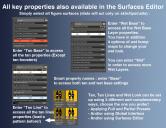
- All the tans (+skin tones) and wet look effects can be made three ways, depending on what you prefer : via partial or total presets, via a simple global control interface, or via the surfaces editor
- Two wet layers and several wet maps are included, you can control amount and various other aspect of wet look to adjust it to your lights if necessary (maps and maps strengths, roughness, exponent, grazing and normal factors)
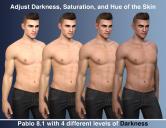
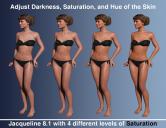
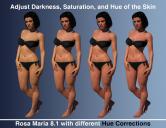
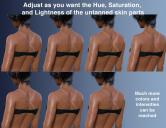
- Tans and skin tones sub-tools include lightness, saturation and hue controls associated with tan boosters and translucency weights tools. They also include many full presets.
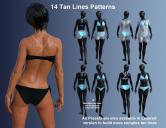
- Many tan lines patterns are provided, and once they are applied, you can adjust the tan lines saturation, lightness and hue.
- Tan lines can be applied directly (for Genesis 8 and 8.1), or combined as overlays to build more complex tan lines patterns (Genesis 8.1 only).
- Genitalia support (shader transfer and maps apply) is included
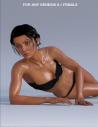
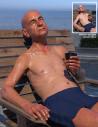
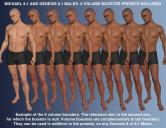
Three different products exist : the males version, the females version, and a Michael 8.1 specific product which also includes exclusive volume boosters for the tan of male figures. They come standalone, or as a bundle. Feel free to use this post or PM for feedback or questions.
Daz 3D is part of 
Connect
DAZ Productions, Inc.
7533 S Center View Ct #4664
West Jordan, UT 84084
Licensing Agreement | Terms of Service | Privacy Policy | EULA
© 2025 Daz Productions Inc. All Rights Reserved.
Comments
I've soooo been waiting for this to finally use G8.1
Awesome!!!
lol!
Someone has been very busy indeed. The promos look very good, and if the 1st one is anything to go by, this will be another must have.
Thanks a lot for this nice comment Doctor (I enjoy calling you this way). Indeed, very busy :) I would not do it a second time, not sure I would survive XD!
Looks fantastic, V3Digitimes!
I use Ultimate PBRSkin Manager as part of my workflow - can I suggest adding a button to directly open this product directly from Ultimate PBRSkin Manager? Or maybe I'm just lazy :)
Looking forward to this one!
Thanks!!! Actually this is a brand new shader, built upon PBRSkin, but not being PBRSkin. For now I did not have the time to make PBRSkin manager compatible with Wet and Tanned Skins for Genesis 8.1, but it will soon be done, it should not be really complicated (I already did this when I made ultimate Iray Skin manager compatible with Wet and tanned skins for Genesis 8 a few years ago). Before that day, the workflow is ultimate PBRSkin manager first if you want to, once you are ok you convert to wet and tanned skins and use the global interface (or the presets) of wet and tanned skins. After I update PBRSkin Manager, you will be able after conversion to use both the "wet and tanned global interface" and the "PBRSkin manager" on these wet and tanned skins. And NO, I don't think I'll put a button to link both, I would not like you to become too lazy XD!
Release today : https://www.daz3d.com/wet-and-tanned-skins-for-genesis-81-bundle
Congratulations!
First look: Everything is working as expected. Many thanks for that
Thanks to both of you!
Thanks laurita! I triple checked everything and Daz tested it too, but with the HUGE amount of stuff included, and the long period of development (with tons of "dev" then "final" folders), I'm glad you confirm :)
Looking good. A little disappointed though as I had hoped for an extra discount for owners of the G8 Wet and Tanned Bundle. But one cannot have everything I guess.
Anyhow, one additional question: Why is there a "Tans and Tones" product for Michael & friends included but no version for Vicky and the girls? Is that on purpose? Will it come later on as update or addon?
Well, I understand your point of view, but what is invisible for the user is the amount of work involved to create the new shader (I could not use the previous one based on Iray Uber but I had to create a new one based on PBRSkin), to make the whole thing compatible with both Genesis 8 and Genesis 8.1 UV sets (and with Genesis 8 or 8.1 using a Genesis 8 material), to optimize everything for the widest cases of figures (lighting conditions, generation of the figure and initial skin), to create and test all the presets, etc, etc, it took me at least as much work time than making the "8" version, maybe even more because the shader is newer and was less stable in the shader mixer (a mountain of issues during development). This is why it can be considered as a "100% new product" and not "only an update for a new generation". I'm always trying to be honest to the users, and to make that the price always reflect the amount of work included, and sometimes less than that (when the final interest/result is lower than the amount of time).
For the Tans and Tones, this was 100% a matter of timing. I did not have the time to finalize an additional "dedicated to a female" product, but I'll have a look at the best way to handle that depending on the people feedback and requests. Anyway I'll find out the best way to provide "at least" the female version of the volume boosters included for now only in Tans and Tones for Michael 8.1 (so for males) now. Maybe included in a female version of tans and tones.
Thank you for your feedback. All I needed to know. In the cart it goes hoping for some additional Vicky love later on.
No problem, I'll have a look later on indeed :)
The Wet Drops are a very nice addition too. I am still tinkering with them and haven't found the perfect bump map yet but this look smore than promising. I am very happy with this. :-)
Thanks a lot! I hesitated a lot before adding/keeping the drips (drops) second wet layer because I knew that it might be a bit harder to handle than the wet base (first) layer, but I kept it at the end because it can strongly diversify your wet looks. If you don't want to tinker too much, the fastest is to use a two views in your viewport, one being your iray, and the second one being an additional "area : rectangle 10x10 min" spotlight you move in order to enhance the contrast via reflectivity of the drips on the figure. This "two views" technics is super helpful for any wet scene you have, whatever the wet method you use (wet and tanned skins or other wet technics).
edit : if you want a "drip" effect, you must choose the first wet drop bump map...
I need sweat
For base sweat you have the 2 first maps of the base wet layers, and there is also a similar map with "base+drops" that you can use either in the base wet layer or in the wet drops layer. Anything used in the base layer can be combined with something else used in the drops layer.
Wow, it's definitely the one I really want. A quick question, is it applicable to G8 figures as I noticed that this product is more optimized than the previous G8 version product?
This looks great but what about a tutorial on how to make the tan lines files. I have many a swimsuit that will not align with the tan lines that come in this. Being able to make the tan lines for any outfit would be a huge plus.
Understood, if you need super precise tan lines, you need to be able to paint your mesh (this can be done in blender which is free).
The tuto to make an exact tan line is simple :
1. export Genesis 8.1 figure as obj, export the swimming suit as obj (with surfaces + UVs, no need to export maps).
2. import both objs in your painting software (you can use the free blender if you have no painting software). If you have a painting software which imports only one model, export figure+swimming suit as a single obj)
3. set all figure surfaces black, then paint in white everything under the swimming suit (many blender tutos for painting are avaible on the web). Export images and load them in all the mappable "tan lines" properties.
PS : I cannot make a video tuto because not allowed to show nude clays, which would be necessary for the explanation.
And that's all.
Thank you for the tutorial. This will be very handy.
No problem I'm always glad to help!
We do allow clay-renders to be nude for the forums.
It might also work to bake occlusion onto the figure with the swimsuit in place - that is, after all, what tan-lines are.
If I buy this bundle, is there any benefit to also getting the older Genesis 8 products?
Only you can answer that. This one focus primarily on 8.1, the other one on 8. So it depends on how often you use Genesis 8. I would get it for completeness.
A great product thanks and very much needed. My problems concern the gens aspects. I can get the results I want for the skins, tanlines, wet effects etc but when I try to apply the refined settings to the gens (G8.1M) they just go black. In the end I have to resort to manually adjusting the gens but that's not always easy. The instruction PDF doesn't really cover this aspect except to suggest that it's straight-forward! I'm clearly doing something wrong but I can't find out what. Can you help?