Show off your Iray Lighting Scenes [tip & tricks]
 DzFire
Posts: 1,473
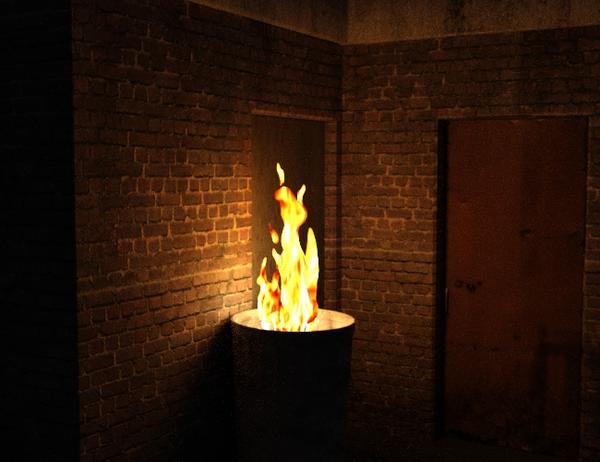
Thought I'd start a thread to let everyone show off their Iray lit renders, and share some ideas on how it was accomplished. To start off, I'm going to start off by giving away a freebie and a quick tutorial.
Here's what you get, a fire object and flame texture map: http://www.mediafire.com/download/a2q2c440r48212q/DzCampfire.zip
First, open any environment (I used the Behind the Neighborhood) and import the fire.obj model into your scene. Apply the DzCampfire.jpg texture map into the Diffuse channel in the surface tab.
Now, if you have them, look in the 'Iray Real Light' in your Shader Presets tab for Monitor Screen shader. Using the surface selection tool, select the fire prop. Holding down the ,ctrl. button, apply the shader to the fire prop. You should now have a fire that emits light now.
To clean it up for rendering, we need to scroll down in the surfaces to the Emission Color and apply the DzCampfire.jpg into it. We will also apply the same texture map into the Luminance (cd/m^2) channel. At this point, the fire is ready to render.
To render your scene out at night, open the Render Settings tab. In the Environment settings under Environment Mode, select Sun-Sky Only. Turn on Draw Dome, and change SS Time to a good night time (I used 3 am).
Render ;)


Comments
"Dropping in" lit entirely with light emitter shaders
Just finished this one, also done only with emitter shaders. No postwork.
Edit. PS. Thanks for the freebie DZFire. :-)
Tips and tricks. :)
OK. Grab all the light materials in Utopia Deck C.
Apply the Fluorescent 60 watt to them all.
Change the luminance units to cd/m^2.
Select the ceiling lights and turn off 2 sided light.
Select the Monitor Screens and Ctrl-Click the Monitor shader, keeping the textures.
Change the luminance units to cd/m^2.
Copy the diffuse texture to the Emission Color channel.
Do the same to the lights on the drone.
Under render settings, under filtering, turn on bloom filter.
Adjust Tone mapper to taste. :)
For full size image: http://www.daz3d.com/gallery/#images/72848
This was helpful! I wish information like that had been supplied in the readme or a PDF user guide. Did I miss some documentation?
Question - why use the Monitor Light instead of the Campfire for a fire? When is it appropriate to use the Campfire light?
Looking forward to more tips on how to use your lights. Thanks.
I wanted to keep the fire texture looking like a fire so by keeping the kelvin neutral and having the texture map plugged into the emitter and lumans, it gives off the right light and colors.
I wanted to keep the fire texture looking like a fire so by keeping the kelvin neutral and having the texture map plugged into the emitter and lumans, it gives off the right light and colors.OK, it looks nice that way, but then when is it appropriate to use the Campfire light? Can you give an example, please? More hints will help me use your lights more effectively. Thanks.
Edit - on reread, that sounded a little argumentative. I didn't mean it that way. It is a sincere query for understanding.
Years ago, I wanted to do a post apocalyptic scene with a bunch of campfires and I was never able to get the light to fall right. So, for Iray, I made one so I may go back and make that scene, if I ever get some free time.
Edit - on reread, that sounded a little argumentative. I didn't mean it that way. It is a sincere query for understanding.It works for when you aren't using a colored texture map.
Edit - on reread, that sounded a little argumentative. I didn't mean it that way. It is a sincere query for understanding.It works for when you aren't using a colored texture map.Oh! Thanks for jumping in. The light (pun intended??) is beginning to turn on! I get it now. The Campfire light has the Kelvin temperature set to provide the orange glow when the object is not orange colored.
lots of uses for the campfire light, torches.. fire places
it's very handy
My TIP: For the fire flame flat meshes use the two sided function and it will emit light from both sides of the mesh. :)
Here is my picture with the campfire.jpg. I turned on the Bloom filter. The settings I used (chosen by experimentation):
Bloom Filter Radius 0.08
Bloom Filter Threshold 20000
Bloom Filter Brightness Scale 0.05
I set my sun/sky to 6:30 pm at latitude 28 in June to get some ambient light to show the urban background (Stonemason's Streets of NYC Townhouse Row).
Edit: The lights on the building have the 100 W bulb light applied.
Very cool with the bloom effect
My lighting tip for Iray is instead of adding more lights to a scene or increasing/decreasing the luminance, have a look at the Tone Mapping first. In the scene bellow I used 3 60watt bulbs from the Real Lights collection, which in the real world is more than enough to light up any household kitchen.
At the default render settings it was way too dark so I increased the ISO to 200 and dropped the Shutter Speed down to 16 to let in heaps more light. The final result having the scene well light without losing any of the real world values of the bulbs.
The presets are based on real world sizes, so, for example, if you apply the 40 Watt Bulb setting to a mesh bigger then a normal 40 Watt Bulb, it will be brighter or if you apply a 60 watt setting to something smaller then a normal 60 watt bulb, it'll be dimmer. If this is the case, the settings will need to be adjusted up or down in the 'Luminance' drop down in the 'Surfaces' tab.
For a while, I was going to use the setting for the filament itself but, realistically, how many filaments are modeled out there compared to just the bulbs? :P
Not many...it took me a lot of searching to find a bulb with a filament.
What would be great would be a preset or two for larger surfaces; like your regular light strip. For example
"40W Surface up to 10cmx10cm"
"40W Surface up to 30cmx30cm"
"40W Surface up to 50cmx50cm"
"40W Surface up to 100cmx100cm":-)
Of course, I can manually tune them down, but that would be just guesswork, not 40W. Also, for convienence reasons, it would be nice.
(That said, I love the lights. :-))
I wish more people would do this.
Throwing more and more light at the problem brings us back to the days before we had working gamma correction.
More light is not always the answer!
I wish more people would do this.
Throwing more and more light at the problem brings us back to the days before we had working gamma correction.
More light is not always the answer!I cottoned on to this early on so I try and set up the lights as close to real lights as possible and then adjust the Tone Mapping. Like I said in my render thread Iray relies on Tone Mapping more than Lux does.
This is from way back in the beta. I'd probably do better with it at the moment.
2 spotlights to illuminate the figure. Everything else is lit by emitters.
I used Tone Mapping to get the right exposure, but this is one of the few times where I used the global Cm2 factor slider to squeeze some more light out of the sources.
Its better if you see the full size version in my gallery
The Trooper 2
I've said it in other threads, its a lot easier to tweak the tone mapping than it is to try and adjust all the lights/emissive shaders in a scene.
...I just convert all shaders to either the Iray "base" or to specifics like glass, metal and skin where appropriate, as it reduces time over having Daz perform auto conversion as part of the rendering process. This also gives me the parameters to adjust characteristics as I see fit.
There are times when adjusting the emissive shaders is important especially if one is going for photo realism.
Yep never let DS do the shader conversion on the fly if you want realism. Though I must admit it does do a good job sometimes.
...it does, and sometimes you have no choice when material zones are not well defined. However, yes, taking the time to convert shaders to their Iray equivalents goes far for making a scene look more "real".
Wondering if any one has any tips on the Max Path Length in the Optimization and why the default is -1.
My feeling is it is how many times a Photon bounces before it fizzles out so I don't understand the -1.
It appears to be an optimized value, if my research is correct, which is balancing quality and render time.
There's some good experiment about it here:
http://demontroll.deviantart.com/art/Max-Path-Length-Iray-Render-Setting-Daz-Studio-523511805
It appears to be an optimized value, if my research is correct, which is balancing quality and render time.
There's some good experiment about it here:
http://demontroll.deviantart.com/art/Max-Path-Length-Iray-Render-Setting-Daz-Studio-523511805
Thank you for pointing that out, I have been setting it to 16 as I remember reading somewhere that photons bounce about that many times (on average) before they die off.
My best method for lighting skin right now is this (I know I've shown this image elsewhere, but I used the method here).
1. Optimize your skin shaders. This has been covered at some length elsewhere, including on my deviantart.
2. Load three primitive spheres.
3. Arrange them so one is slightly right, one is slightly left and one is slightly behind the figure off-camera. Distance needed varies by how close the camera will be and the skin tone (brighter light for darker skin and vice versa). Adjust the units in kcd/m^2 (so you don't need millions, just hundreds or low thousands).
4. Set the lights to be slightly white, slightly blue, and slightly orange (the orange one goes in back). The orange light should also be warmer (3500 or so), and the white light should be brightest and the blue light dimmest.
5. Add a dim photometric aimed at the eyes to produce shiny highlights, if the front spheres aren't reflected.
6. Make sure your HDR is turned down low.
Others have also used two planes instead of three spheres, but this basic schema seems to work. having lights that contrast in color picks out skin's highlights well as long as you don't overdo the color saturation of lights at default tone mapping values.
One of the things with Iray is that you always have to adjust light strength according to the light's position, because falloff is realistic, unlike with 3Delight or other biased engines.
An alternate method for "outdoor" instead of "studio" lighting:
1. Set up the sun-sky system at the time of day you wish to depict. Turn down the strength of the sun disc to 0.5 or so.
2. Add a primitive sphere or plane to the opposite side of the figure from the sun direction. Tint it blue.
Thank you for this looks like super awesome.just a question, can this campfire fire be used as candle fire? im finding a way to light up a candle