Oso Fur Shaders for Iray [Commercial]
 Oso3D
Posts: 15,039
Oso3D
Posts: 15,039
https://www.daz3d.com/oso-fur-shaders-for-iray
Huzzah, it's live!
This is something I've been working on, sporadically, since December. Nice to finally make it available.
What is it?
Displacement fur.
There are a number of other products that use displacement maps to create fur-like effects. The big limitation they have is that a single noise map to generate hairs can't easily also control how long that hair is over a figure.
Oso Fur uses a procedural generation of noise to generate the fur, and then also has a fur length map. In this way you can easily create a map where the fur is longest around the torso then gets very thin around the face and hands.
How good is it?
It's displacement based, which in Iray has certain limitations. Displacement in Iray moves the points of a mesh, so it needs a decent density of a mesh and a reasonably consistent size of polygons over the target.
For example, I attempted to use it on a pillow and discovered most of the surface of the pillow were large squares, with many many many tiny polygons along the edge. Which is a good design, but not great for displacement; the 'fur' looked really nice along the edges and lumpy on the top.
Also, displacement goes straight out. There's no way to make fur 'lie flat.'
All that said, it can look very realistic, particularly if the underlying figure's texture synergizes with fur.
It's also significantly faster than just about every other fur technology I've tried, like LAMH and fibermesh. Also, it adds very little to file size, unlike the GB a modeled fur will generate.
I really hope people enjoy this and experiment with their own maps. Create a high density sphere and make it furry!
It's also a Merchant Resource, great for enhancing your products!
Here are a few bonus promos...

Daz 3D is part of 
Connect
DAZ Productions, Inc.
7533 S Center View Ct #4664
West Jordan, UT 84084
Licensing Agreement | Terms of Service | Privacy Policy | EULA
© 2025 Daz Productions Inc. All Rights Reserved.
Comments
Can you make a realistic dog? Different types of dog?
If you have the different breeds of Millennium Dog, you can apply them and then change the base color of the fur. You can also make the fur longer or shorter.
Anything fancier than that will require new/changed fur length maps (like if you want longer fur on the tail only)
looks really good, will.
and you totally win the award for 'best promo line of 2018,' as far as i'm concerned.
"make it Oso Furry!"
:)
j
I considered Oso Fluffy, but ... ;)
so this makes any surface you have furry keeping the original color?
It can be used that way, but the recommended format is to create a geoshell and make THAT furry, copying over the base color.
For one thing, I find with a lot of hair and fur a slightly lowered opacity helps create a sense of fur, rather than plastic bathmats (try it with some fibermesh hair)
How do you keep the fur out of the eyes, I applied to a geoshell and turned off the eye part in parameters tab but it still looks like hair is still covering them, in your lizard promos or even the husky preset it doesn't apear to have that problem.
Two possible issues:
1)
Not enough of the eye is switched off; there’s iris, pupil, sclera, and a bunch of others depending on generation (eye surface, cornea, eye reflection, tear, and maybe others).
2)
Parts of the face are close enough or behind eye, and the fur is poking through.
You will want to use or make a mask to either make the fur at the eyes very short (black) or make a similar cutout mask.
This is, by the way, what lead me to create Oso Fur. Just putting noise maps into Displacement mean that a lot of ugly edges fluff out, and there’s not much you can do about it with Iray Uber.
My personal preference with masks is using Mudbox (which is cheap), paint eyes and similar black, then carefully blur the edges and export the result.
Then I convert it to Grayscale (not strictly necessary) and make sure nothing is transparent and bam, you have a mask!
Also, if you want to make masks with longer and shorter bits, start with medium gray and paint in blond of black and white, blur it in.
If you are using Genesis 8 models, you can simply use the Husky fur and swap out the base color maps to whatever you are using (or to no map, and use a color preset)
Thank you, I am really liking the shaders I have Lamh but never figured out how to make my own presets this seems a little easier, but is there any way to fix poke through on clothes?
I'm definitely planning on getting this (I'm a bit tapped out at the moment). I'm really looking forward to getting it. And the fact that it's a Merchant Resource is wonderful! Thank you, Will! :)
Great shader. I have bought it right away. It is obvious, that it will be useful in many different scenarios.
Jedijudd: There are a number of tips mentioned in the readme for dealing with fur and clothing.
1) Hiding fur
The easiest approach, you can expand the nodes of the fur (Hips/Pelvis/etc etc) and simply hide (toggle the little eye) all the fur that's where clothes are. You can also go into the Geoshell Visibility in Parameters/Shell/Visibility; Visibility can be set by surfaces (Arms, Legs, Face, Ears, etc) or Face Groups (which are broken up by rigged body parts, so allow you to be potentially more precise).
Unfortunately... this probably won't work really well by itself, because clothes rarely line up with surfaces or face groups. But it might get you close enough, or be a good starting point.
2) Pushing out the clothes
If clothes have Expand All morph, you can use that to push the clothing until it's spaced out enough so the fur doesn't poke through.
If the clothes don't have expand all, you can go to Edit/Object/Geometry/Add Push Modifier. Adjust the 'Offset' that is listed.
This can be a pretty easy approach, assuming your clothes don't turn goofy when pushed out, and particularly if the fur is fairly short.
3) Cutout Opacity
This is tricky to do but works very well; create a mask where the parts of the body covered by clothes are blacked out and everything else is white, and stick it into the fur's cutout opacity.
The hard part is managing to get the edges lined up right; you'd probably want to migrate the figure and then also the clothes converted to obj to a 3d paint program. Then you'd paint on the figure while toggling the clothes off and on.
In a pinch if you have a really good eye you could do it in Photoshop on a figure template (IE: grab a random Torso map and paint over it).
Approach 1 and 2 are general solutions to this issue with any fur; you'd do much the same thing with LAMH converted to Obj, fibermesh, etc.
Thanks you for the help
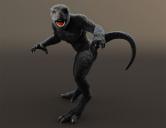
i really love the way both of the objects in this promo shot look, but i'm having a hard time figuring out how the shader generated their surfaces (or how i'd be able to use the shader set to create similar surfaces, i guess i should say). they don't seem to have the 'furry' quality i'm seeing in the other promos.
sure look good, though. :)
j
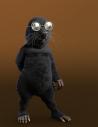
Totoro reference in the promo?
Jardine: Yeah, they are totally not furry... but I just wanted to outline some of the potential uses of the shader. In this case, lowering the 'fur scale' a LOT, you end up with essentially 'random displacement', suitable for rocks and ice and so on. The magic sphere shield in the ice dragon promo is also Oso Fur, with the jutting icy bits being really magnified extrusions.
Bluejaunte: Hee!
Here is my try using a negetive offset wanted more skin showing, got some poke through on clothes could not figure out how to fix even with Oso's help but still like it more than flat skin.
I was wondering I like this product but can I use displacement in DAZ Studio as a sort of poor-man's Z-Brush? Is there a way to have DS apply the displacement to the mesh at viewPort subD 0 and then save the sculpted changes at subD zero as a new figure?
no, because I have been asking for this since they introduced HD morphs sadly so I can use them as figures in other software
its all part and parcel of the DAZ allowing PA HD morphs only
OK, thanks...
well, bummer.
Beautiful work!
now on the otherhand Will could make a furry HD morph
I did this silly dsplacement map, all I could export it as being a non PA
I don't have Will's shader as I mostly use Octane if I even use DAZ studio, it may work better with his shader
I have access to HD morphs, but honestly... there are only a few situations where I would use it over a Displacement map:
1) The details need to not be straight out. Like, imagine a rose person covered in curved thorns or long curved petals. If I want details that really curve, I need to sculpt it.
Having said that? Even for some REALLY weird monster effects, I rarely need this.
2) You want the freedom to easily mix the details with other displacement/HD morphs. I mean, sure, you could try to combine displacement maps, but...
Again, this rarely comes up, really.
3) More reliable seams.
A displacement map can, if you aren't really careful, come apart at the seams. HD morphs won't.
And keep in mind that whether you use HD Morphs or Displacement, you STILL need to set the Subd high enough to see the effect, either way.
All in all, though? Unless you are making seriously weird stuff, displacement is fine. A number of programs will let you take a high density mesh and 'bake' it out into a displacement and/or normal map. (I recommend Mudbox, because it works well and it's also only $10/month!)
My recommendation is use Normal maps for fine details that don't significantly alter the surface, and then both Displacement and Normal maps to get a lot of movement plus fine detail.
thanks
Congrats on this product, Oso, I'll have it with my next purchase
Would be possible to do a poodle dog fur? Thanks!
I wish your next product to have a focus on creating new organic and horror skins
EquisVoid: Not my next product, but I do have such things in mind down the road. ;)
nice! thanks.
j
Below is my try with Millenium Cat.
Any possibility to create masks around eyes, nose etc in Daz Studio itself?
Having a gravity and comb/rotate fur properties in the shader will be awesome.
What is the purpose of the presets in the Animal folder?
I have tried OFS Cat Fur preset from Animals\MilCat\Hair\Oso3D\Furry
but it does nothing.
There is no mention of the presets in the documentation, either.