Daz 3D is part of 
Connect
DAZ Productions, Inc.
7533 S Center View Ct #4664
West Jordan, UT 84084
Licensing Agreement | Terms of Service | Privacy Policy | EULA
© 2024 Daz Productions Inc. All Rights Reserved.
Comments
Varsel - very nice scene - love the concept of rubble in what is a grand structure
EP - love the Dino scene ! Thanks for the work-flow, always enjoy your approach to Carrara !!
Diomede - hope those Bee's don't get aggro !!! Ancient City looks great as well !
eD3D - gorgeous pyramids, keep thinking of Doctor Who - "Pyramids of Mars"
UB - great to see Aiko getting some airtime, lovely render !
Stezza - excellent lego render !!
Thanks Bunyip02!
I'm thinking of entering this one. It started out as me experimenting with dynamic cloth. Something I haven't really done a lot of. Mostly it was because my old computer was very slow, and then when I did get my new computer I was heavily into production of my second play. After that, it just kept getting pushed back as I didn't have a lot of Carrara time. Now, due to some health issues, I have some more time to experiment.
_ Thanks very much _ don't recall seeing + Doctor Who - "Pyramids of Mars"
evilproducer: looking good +
Diomede, ed3D, DesertDude, Bunyip - thanks for the positive comments on the Aiko render!
But the render was missing something. It seemed to me that an anime render wasn't complete without a Mech or two, so I added some. :)
I figured I would concentrate my WIP for my second image on the modeled elements since the theme is structured/unstructured.


The setting is something I've been playing around with for quite a few years. I have a pretty clear idea of what I want, but in the past my modeling skills weren't up to the task. They are getting there, but I begin building and I get to a point and think to myself that I could have done this or that better or more efficiently. This iteration is no different. Right now, the set uses a lot of placeholder textures (many from the shader browser) until I come up with better ones.
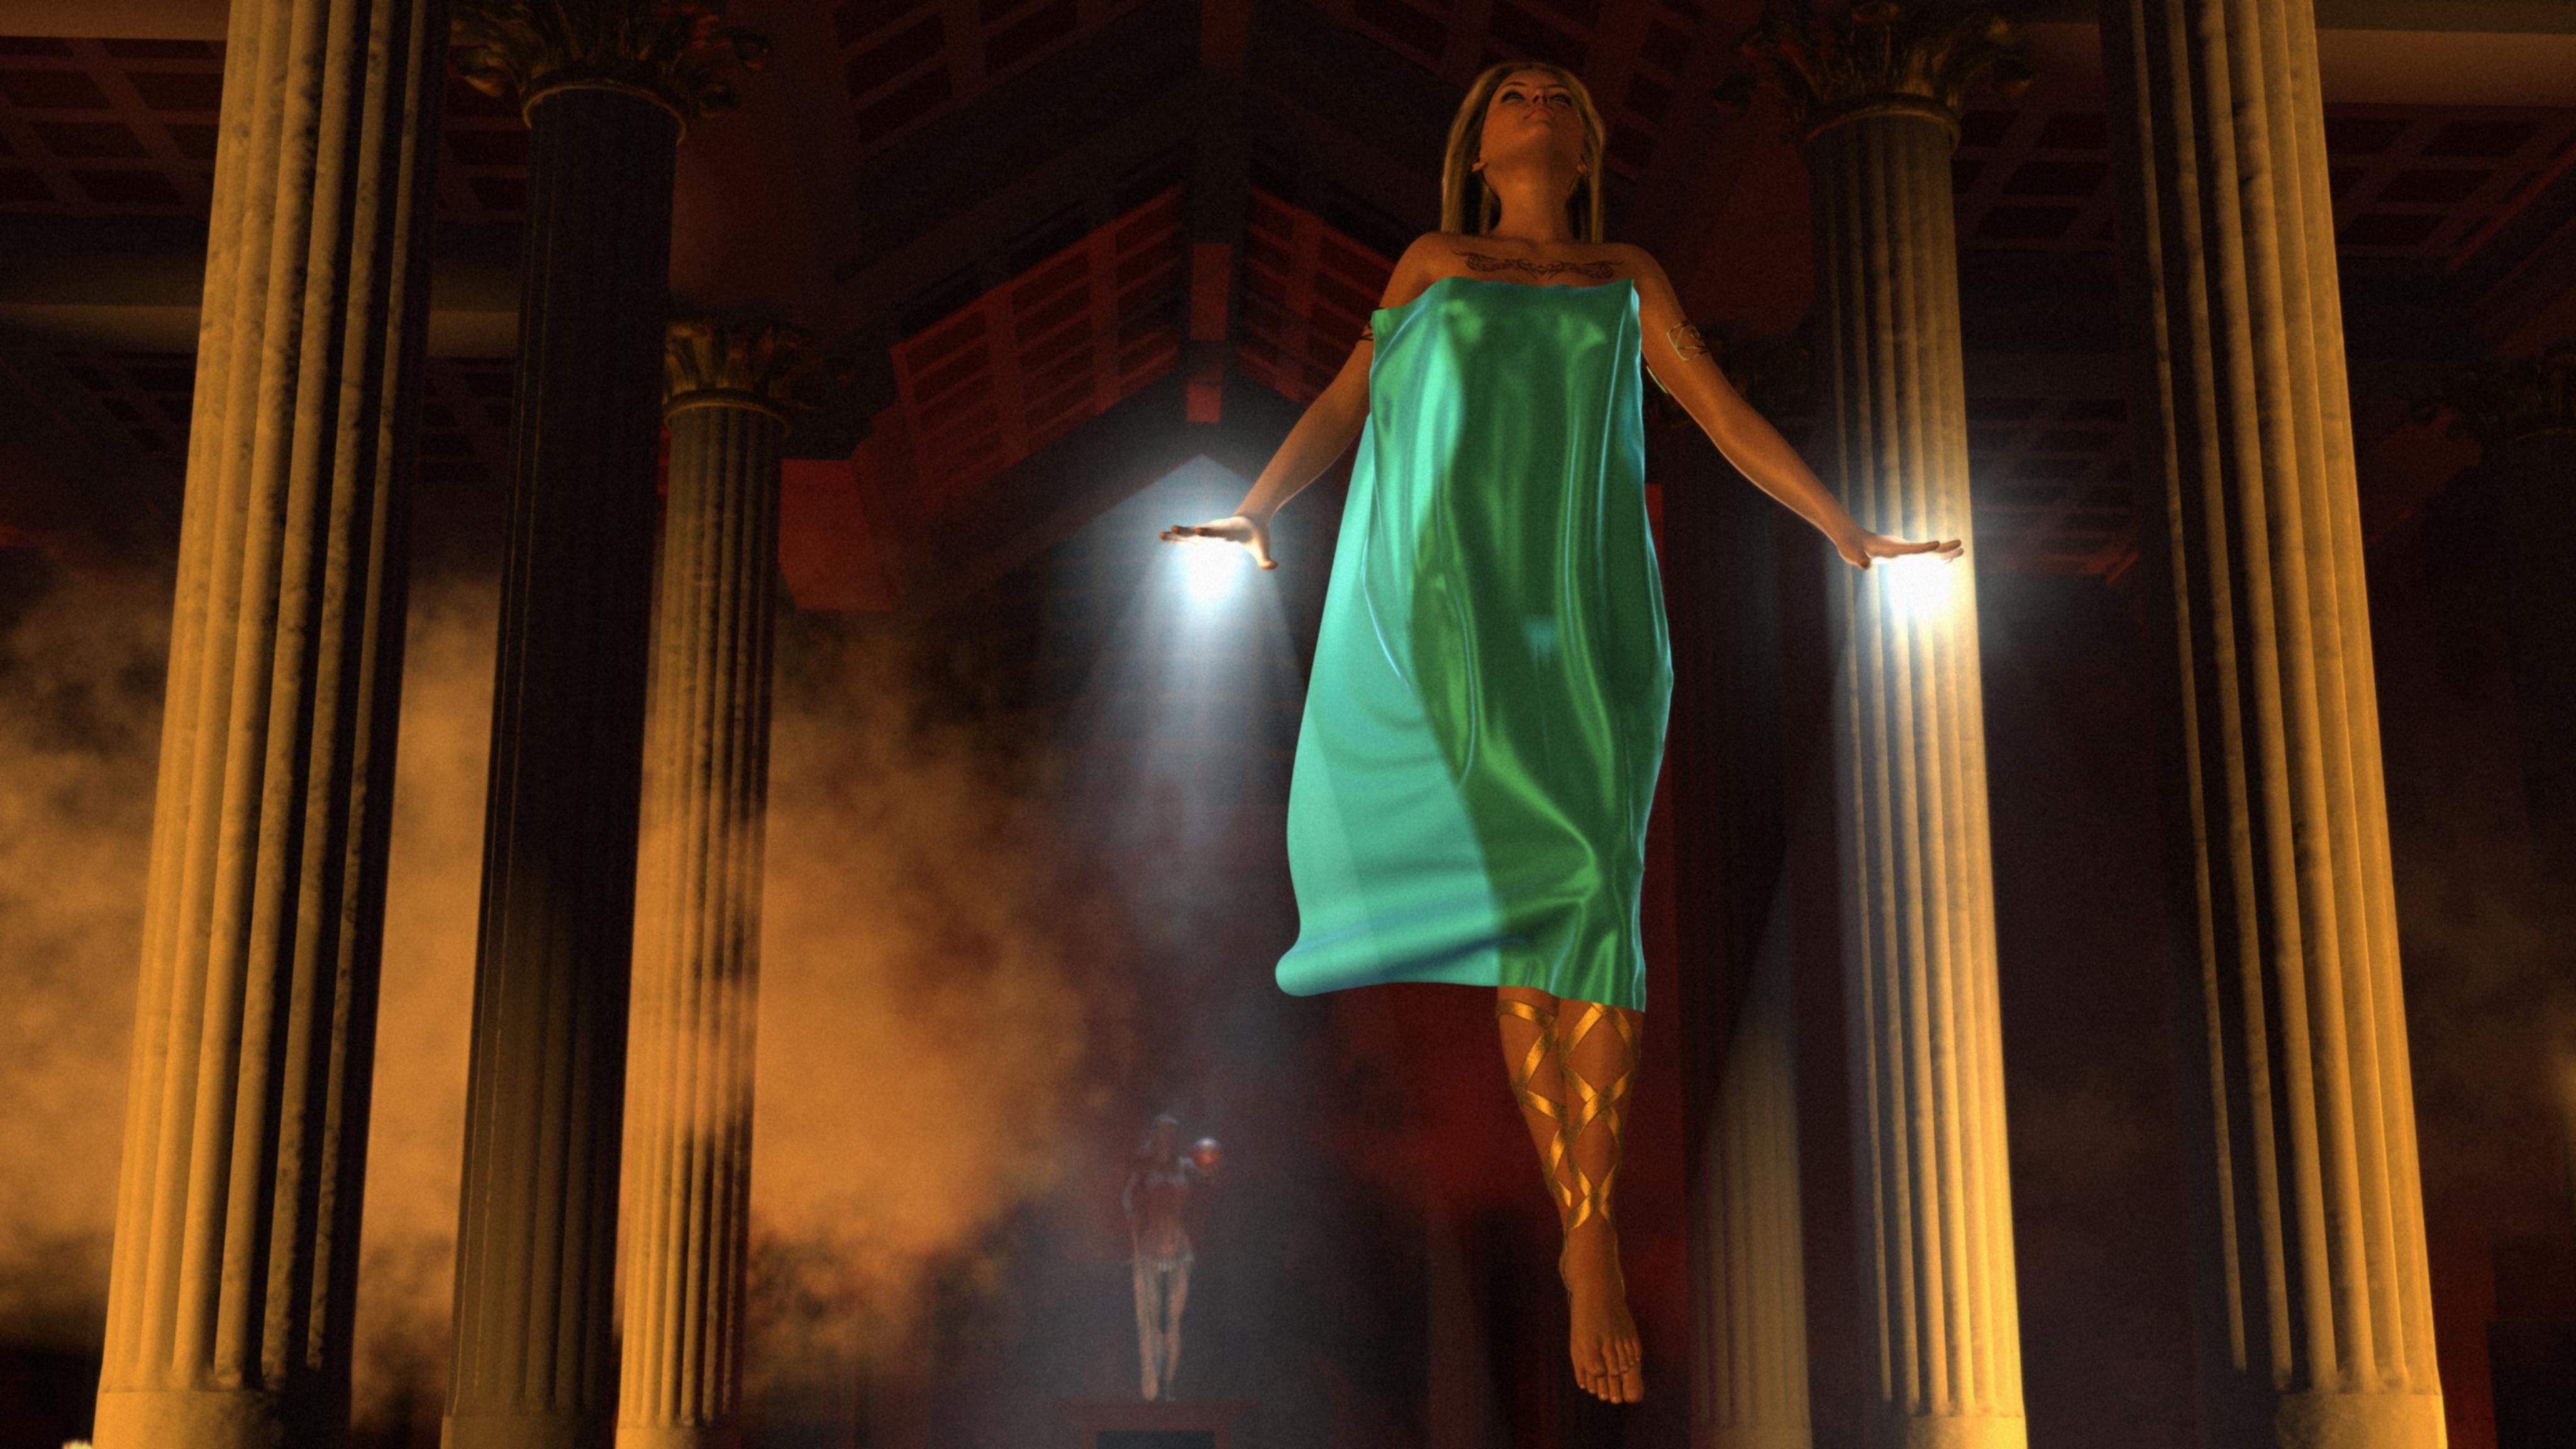
The idea is to have a subterranean temple with a river of lava separating the alter area from the main hall. I want the scale big. I'm talking Lord of the Rings Moria big. I have this half-assed idea for a story/motion comic that would use this as a major set piece.
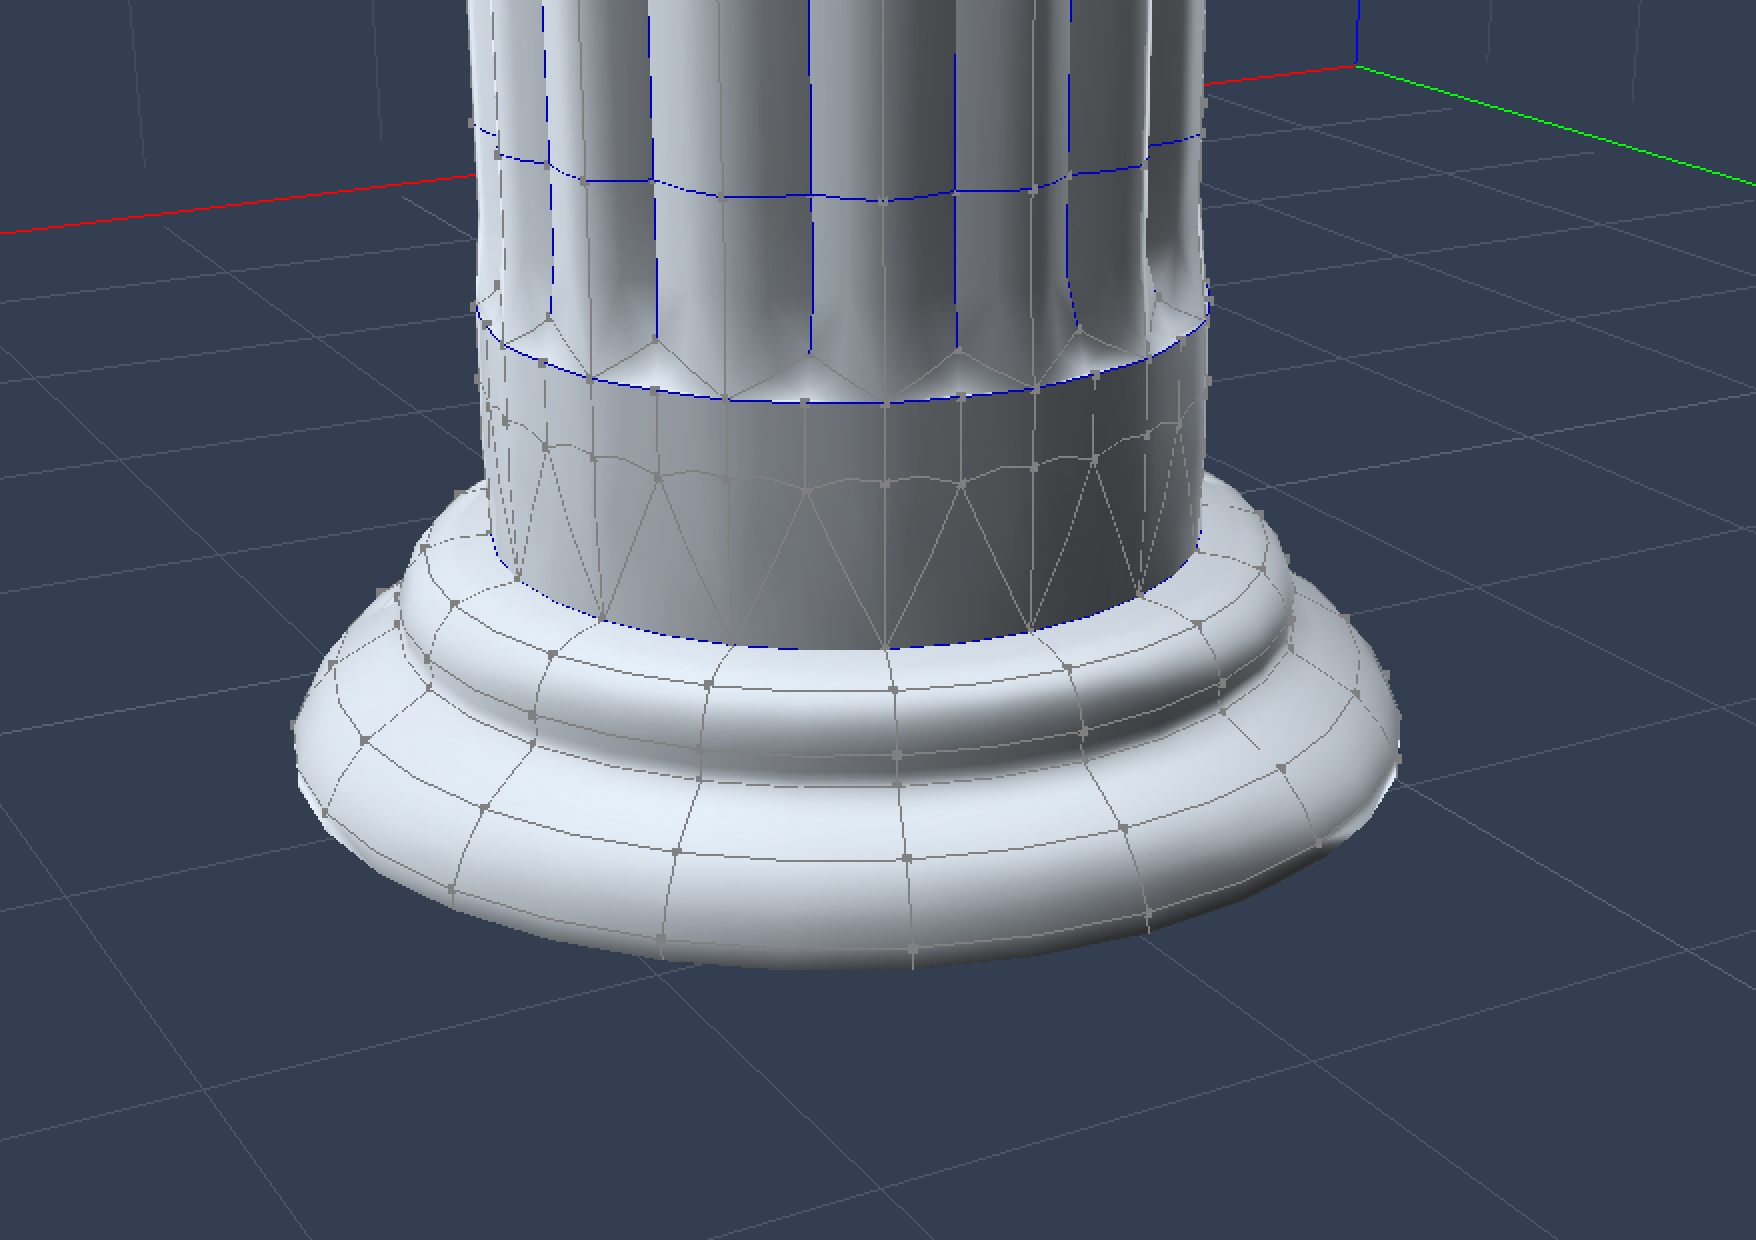
The first element I built was the pillar. It consists of many different poly meshes. I didn't bother to weld them together as I'm not selling it (although if I get a version I like, I may give it away). The mesh is fairly heavy in some spots, but not totally unreasonable. There are some tris near the base, but I was pretty happy that I was able to stick to mostly quads when I modeled it. It has shading domains, but is not UV mapped.
I have the pillars duplicated and grouped together in the Assembly room, and have a seperate vertex model for the main temple itself. I tried to keep the mesh reasonable in size, yet high enough in resolution to do some displacement painting. I want it to look like it was partially carved out of a lava chamber and also built by a higher order civilization on a par with the ancient Greeks, Romans, Phoenecians, Mayans, etc. In this iteration I've gone more for a Greek/Roman look. Previous versions looked more geometric and squared off - more like some Mayan architecture. Again, the scale is supposed to be huge.
I haven't really done much with soft body physics and compared to some, I still haven't. I wanted my sorceress/high priestess to look like her magical forces were blowing the sheet against her. I started with a flat sheet and directional forces, but it wasn't blowing under the arms and wrapping around the torso like I wanted, so I used soft select and manipulated the sheet to start partially bent under her arms. The shader was supposed to evoke satin. I used Translucency, Highlight/Shininess, and Fake Fresnel to get the look I was after.
UB - I didn't think Aiko could get any better, but adding mech was excellent. Perhaps a mech pilot could be glancing toward Aiko?
Evil - fantastic set, and I'd say your modeling skils are more than up to the task. I take it you did not start in the spline modeler and then convert? Grand (both in the good sense and the scale sense).
Thanks. I think you have a great idea. However, to really see the pilot's features - and the glance - I think that the Mech would need to be bigger. Not sure if that would start to unbalance the overall render.
For me, the last 5% of a render takes at least as long to polish as the previous 95% - and often longer. Sometimes I need to quit before I go crazy. :)
But I'll try it anyway, thanks.
EDIT - Changed it in the above render. Thanks again for the suggestion.
Haha! The only spline model in the scene is the pedestal the statue is on. LOL!
That's looking great Diomede! The city has a nice look of randomness.
evilrproducer - that's friggin' awesome! For me that has an 'other worldly feel'...those lights beaming out of her hands are eerie. I can hear a haunting soundtrack in my head as she floats up. Cool stuff, and fantastic models!
UnifiedBrain - nice addition to the image. I can see them well when I look at the full size image.
Thanks!
The trick for the light beams was to parent a spotlight to the hands, and move them up enough and adjust the half angle and fall-off so they were only illuminating the parts of the top of the hand I wanted. I then added a 3D light cone to the lights, adjusted the intensity and fall-off of the cone to my liking and enabled the shadow option and checked the checkbox that reverses the shadow from the cones so that it looked like the cone was originating from the hand, rather than the hand making shadows in the cone. If that makes sense. I'll post some screen shots later. Right now I'm rendering something.
Just for accountability, I am also changing my Apocalypse render. A new background.
I usually try to enter no postwork renders in the Challenge, to show what is possible in Carrara all by itself. But I ended up needing a tiny bit of postwork on the first Apocalypse render, so I thought, what the heck, lets see what PSE can really add.
I used a couple of Ron's brush and image packages, and had fun. Layers are a blast.
Very middle-East - don't forget the flying carpet
Looks really good. I don't know the final scene you want, but there are a couple suggestions that come to mind if you don't mind.
For the brick texture that you thought looked a bit dull, have you considered using a color gradient in the color channel so the color isn't as uniform? You may need to use some modifiers like Mixer, Multiply, etc.
You may know this already, but for any new users checking out this thread: When you are ready for the final render, consider using Skylight. It could add a bit more pop to the lighting. You don't have a lot of stuff with alpha channels that I can see, so the hit in rendering time shouldn't be too significant.
The other possibility if you don't want to use the Skylight, would be to make a dome in the VM, and use a surface replicator to replicate Distant lights on it. Between 70 and 100 replications would work best. If 100, set the color to blue similar to your sky's color (maybe skewing towards gray a bit), and start by setting the intensity to 3% and going up or down from there based on the depth of shadows you want. It will provide a nice diffuse light with soft shadows. You will still want your primary sunlight. Don't forget to hide dome's visibility and dial down or turn off the scene's ambient lighting. I used that technique for my dinosaur picture.
Thanks for the comments and suggestions on my bronze age city, Selina, DsertDude, Bunyip, UB, and EvilProducer. I always appreciate constructive criticism.
Some more elements to feed the replicators coming soon, such as a few random blocks of wealthier neigborhoods. I agree that a flying carpet is a must if I do a fly-through animation, which might be fun. Will give that thought, but the time commitment would be quite high, and would require rethinking some static people props. Alternatively, a magic carpet and riders could make excellent foreground subjects. I'm pondering.
Believe it or not, the original WIP does use color gradients, mixers, and other operators with global settings for the brick shaders. Obviously need to revisit and spice them up more. Correct that I have not relied on alpha maps for doors, window, etc., so the lighting suggestions are also most welcome. Thanks.
Congratulations, Ann Mclain, crew, and fellow space travelers. Thank you for your service.
But what does that have to do with Carrara Challenge #47?
"The Expedition 59 crew contributed to hundreds of experiments in biology, biotechnology, physical science and Earth science, including investigations into small devices that replicate the structure and function of human organs, editing DNA in space for the first time and recycling 3D-printed material."
https://www.nasa.gov/press-release/nasa-astronaut-anne-mcclain-crewmates-return-from-space-station-mission
Wire mesh ...
Wire mesh II...
That’s Carrara?
Yes! Modelled and rendered in Carrara - no postwork or exterior renderer. Just pure, unadulterated Carrara!
Here's my method - if anyone wants to improve on it... please !!!
This is great!
You can streamline the creation of the long cylinder in the vertex model room by using Construct / Insert 3d / Cylinder (see image).
And in the "Insert Object" window enter Diameter 0.50, Height 10.0, Sides 8, Sections 35 (see other image).
That's very useful to know - thanks
Wire Mesh III...
_ this is about waves like those _ +link below+ _ And again, Thanks
https://www.scientificamerican.com/article/why-do-regular-wavelike-s/
Wire Mesh IV
NOTES:
Pretty awesome Selinita
I still want an easy way to braid/plait stuff though, been my desire for years as one could use it in so many ways, not ropes can make those. 3 cords interlocking s one side z the other in shape offset.
Something like this?
well not quite
not all are going under then over but a start
yes it’s tricky as I have found in all my efforts
lit does not help the illustrations I posted not quite accurate either